(available in ![]()
![]()
![]() )
)
Security Groups are used to
group users together and set their security collectively. For example,
users may be a part of an "Employee" group that has limited
access to change vital information, a "Supervisor" group that
has more access, or an "Administrator" group that has access
to all parts of Spectra. Go to Maintenance
> Studio > Security Groups.

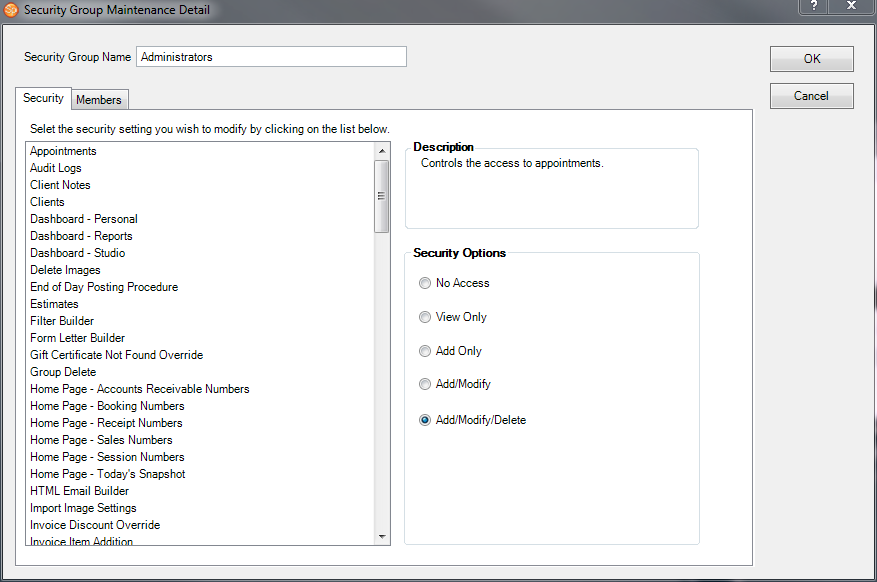
In Security Group Maintenance, double-click on a group in the list to modify it or click New in the Editing group of the ribbon to create a new group. Either choice will open the Security Group Maintenance Detail window.
 Security Group Maintenance Detail
Security Group Name - Enter or modify the name of the security group.
There are two tabs on the Security Group Maintenance Detail screen - the Security tab and the Members tab.
The settings on the Security tab are used to set up your security options for a variety of Spectra features. A list of available security features is displayed on the left. As features are selected in the list, a description and the currently selected Security Options for that feature are displayed on the right.
Use the feature list to choose the features in Spectra that you want to control with security options. Each feature in the list will have a number of restrictions to choose from. In addition to many individual features, you'll see that related features are grouped together in the list. Spectra features that offer security options include:
Appointments - Controls access to appointments, including the ability to create, modify, and/or delete appointments.
Audit Logs - Controls access to the PCI and invoice discount audit logs.
Client Notes - Restricts the ability to modify client notes.
Clients - Controls access to client information, including the ability to create, modify, and/or delete clients.
Communication Wizard - Controls access to the Communication Wizard.
Control Center - Controls access to the Control Center jobs.
Dashboard - Controls access to personal and studio dashboards as well as dashboard reports.
Delete Images - Controls who has access to delete image files.
End-of-Day Posting - Controls who has access to perform End-of-Day postings.
Estimates - Controls access to estimate invoices, including the ability to create, modify, and/or delete estimates.
Filter Builder - Controls access to the Filter Builder.
Form Letter Builder - Controls access to the Form Letter Builder.
Gift Certificate Override - Controls who has access to accept an unrecognized gift certificate number.
Group Capture - Controls access to Group Capture.
Group Delete - Controls access to group deletes.
Home Page - Controls access to the Today's Snapshot panel, as well as to a variety of sensitive data.
HTML Email Builder - Controls access to the HTML Email Builder.
Import Image Settings - Controls access to the import image settings.
Invoices - Controls access to invoices, including the ability to create, modify, and/or delete invoices.
Lists - Controls access to the Spectra maintenance lists.
Lists-Users - Controls who has permission to create or modify users. "Limited Access" means they have full access, with the exception of compensation information. If a user has "Full" or "Limited Access" to this list, but does NOT have User Security permission (see below), then they can maintain the users list, but they can NOT do anything security related, like set a security group, change a password, etc.
Loyalty Rewards - Controls the access to create and deactivate loyalty rewards.
Payments - Controls access to payments, including the ability to create, modify, and/or delete payments.
Payment Plan Processing - Controls access to processing payment plans.
Period Closing Date - Restricts access to the period closing date.
Posted Invoices and Payments - Controls the ability to modify or delete posted invoices and payments.
Preferences - Controls access to company-wide preferences, printing preferences, and workstation preferences.
Price List Maintenance - Controls access to the price list maintenance screens.
Reports - Controls access to statistical reports.
Scheduling - Controls the ability to resolve scheduling conflicts and to schedule during non-open hours.
Session Notes - Restricts the ability to modify session notes.
Sessions - Controls access to sessions, including the ability to create, modify, and/or delete sessions.
Status Change - Restricts the ability to change statuses, users, and dates.
Status Triggers - Controls access to run status triggers.
Tasks - Controls access to tasks, including the ability to create, modify, and/or delete tasks.
Time Clock - Controls access to time clock entries.
User Security - Controls access to security groups and all security features. Only system administrators should have access. Also see the related Lists-Users feature above.
Utilities - Restricts access to the Utilities menu.
Wizard Builder - Controls access to the Wizard Builder.
Yearbook CD Production - Controls access to making yearbook CDs.
The Security Options section on the right is where you'll set the access level of the selected feature for this security group. Although a few options are set to No Access by default, most are set to Full Access.
To set up the security options, open (or create) a security group and follow these steps:
In the feature list on the Security tab, click a feature for which you want to set the security.
In the Security Options section, select from the displayed options. Options may include:
No Access - User(s) will not be able to edit the option in any way.
Full Access - User(s) will have no restrictions on the use of the option.
Add/Modify - User(s) will not be allowed to delete items from your data, only add and modify them.
Add/Modify/Delete - User(s) will be allowed to delete items, as well as add and modify them.
Repeat these steps until all security settings have been modified.
Note: To speed up the process, select a group of features that have the same set of options and set them all at once.
Use the Members tab to add users to a security group.
Highlight the user from the Users Available panel and click them over to the Users Selected panel using the '>' button.
If you have not activated the security features of Spectra, go to the Miscellaneous page in Studio Preferences and select Activate Security Settings. It's up to you to decide if you want to assign varying security levels to users for areas within Spectra. You will also decide if users will be required to log in using a password.
 |
ATTENTION! 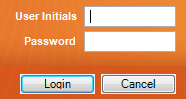
Once you activate security in Spectra,
you will be changing how users log into the software. You will
no longer see a drop-down with a list of names to choose from.
Instead, you will be prompted for your User
Initials and Password. |