In this topic... Show
Click Tools > Filter Builder.
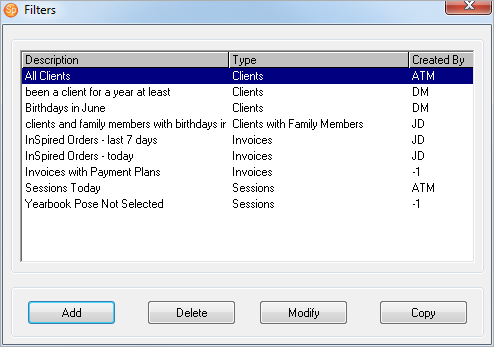
Click the Add button.
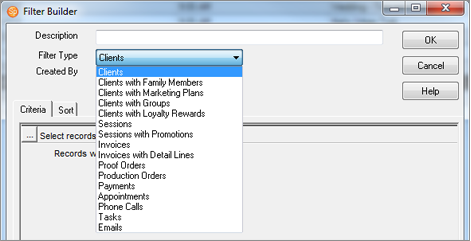
Type in a description of the new filter.
Select the type
of filter you want to create. The filter type you choose will determine
what fields will be available when creating your filter condition(s).
For example, if you want to filter your data based on your client
information and any groups they belong to, select the filter type
"Clients with Groups."
Choose the field you want to filter on by clicking on the first asterisk (*). Note: The fields that are available are based on the type of filter you selected in step 4.
Click "is equal to" to choose the appropriate operator from the list. The operator defines how the field will be filtered.
Click the last asterisk (*) to set the value you want to use to filter the field.
 |
HERE'S A FLASH FOR YOU!
Current Date-Based Filters If you want to conduct a search based on the current date, type "Date()" in the value field, or type "Date()+7" to represent the current date plus seven days. For example: Select a date field, such as Session Date, then select is equal to and type in "Date()" and you will get all of the sessions for today. Enter a date field, then select is equal to and type in "Date()+7" and you will get all the sessions for seven days from now. Enter Session Date, then select is equal to or greater than and type in "Date()+7" and you will get all the sessions beginning seven days from now. |
To create a filter with more than one condition,
click  to
add a new condition. Repeat steps 5-7 to define each additional condition.
to
add a new condition. Repeat steps 5-7 to define each additional condition.
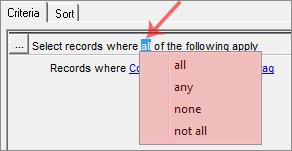
If your filter contains multiple conditions, specify
the relationship between the
conditions by clicking "all" and then selecting the relationship
from the list. Your choices will include "all," "any,"
"none," and "not all."
|
HERE'S A FLASH FOR YOU!
Here are some examples of conditions you may create:
Client–City is equal to Chicago (Includes all clients in Chicago) Client–Last Name starts with M (Includes all clients with last names starting with M) Client–Email Address is not empty (Includes all clients who have an email address) Session–Date is equal to 1/12/2002 (Includes all sessions on January 12, 2002) Session–Redo Session is equal to Yes (Includes all sessions with a redo) Invoice–Invoice Total is greater than 100 (Includes all invoices under $100) |
To verify how many records are in your filter, click Update Results.
To specify how your group of records is sorted, click the Sort tab. You can select one or more fields to sort by and choose whether you want the records sorted in ascending or descending order.
Click OK to save your filter.
Note: To see specific examples of filters that contain a variety of conditions, please refer to the "Advanced Filters" topic in this chapter.
From the Tools menu, choose Filter Builder.
Click on the filter you want to delete.
Click Delete.
From the Tools menu, choose Filter Builder.
Click on the filter you want to modify.
Click Modify. Make changes to the filter and save.
Instead of creating each filter from scratch, copying a filter is a great way to create a new filter that is similar to an existing one, requiring only slight modifications.
From the Tools menu, choose Filter Builder.
Click on the filter you want to copy.
Click Copy.
A copy of the existing filter will open in the filter builder. Modify the filter as necessary and then click OK to save the new filter.
You can display your filters in several ways. You can display the records in a hub, create a list, create reports, or create a group of communication records (i.e., email, SMS text messages, phone calls, and letters).
To display filters in a hub, go to the hub that corresponds to the type of filter you created (i.e., if you created a session filter, go to the Sessions hub). On the ribbon, change the search criteria to Filter. Choose your filter from the drop-down list and the filtered records will be displayed.
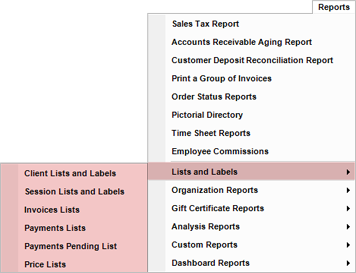
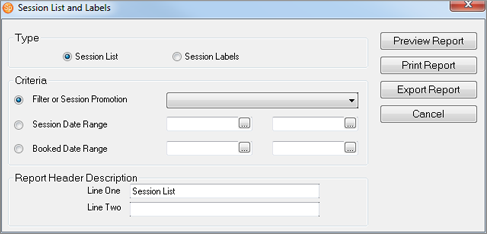
To create a list of your filter results, go to
Reports > Lists and Labels
and choose the type of report that goes with the type of filter you
created. Then select your filter from the drop-down list under Criteria. Click Preview
Report to see the report, Print
Report to print it, or Export Report to export it.
To create a report using your filter, go to the Reports menu and select the report you want to create. Note: Many of the reports on this menu include the option to select a filter. Select Filter as the criteria type and then choose your filter from the drop-down list. See the “Reports” chapter for more information on creating reports from filters.
To create a group of communication records, go to Tools > Communication Wizard. See the "Communication Wizard" topic for more information.
![]()